Thursday, August 30, 2012

Simple Can Always Be Fun!

A simple composition book on sale cost less than a dollar! Of course I bought 10! 

Decided to sass them up a little!  I added Hello Kitty scrapbook paper to cover the outside of the book.

I added some Hello Kitty paper tape to the spine of the book to cover up the black edge.

This is the inside of the cover, I made sure not to cover up any important information that may be needed in the future!

I added a scrap piece of grosgain polka dot ribbon for a boo marker.  I glued it down and then covered it with another strip of paper tape to make it look a little more presentable. 

This is the book mark in action! Another ribbon could be added, if you want more then 1 book mark.


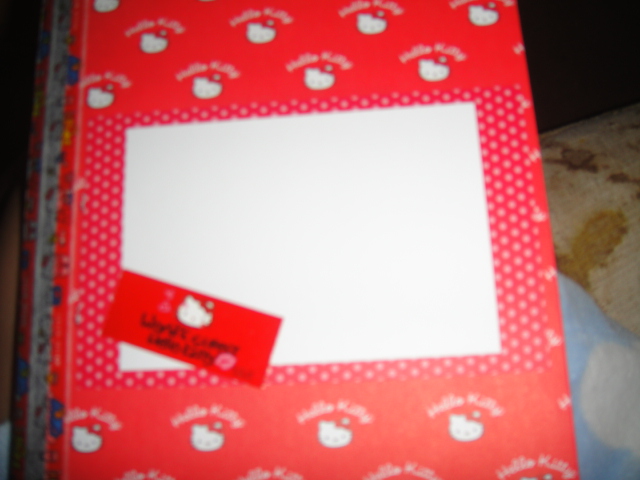
I had a piece of polka dot paper left over from the lunch bunch card, so I used to to matte the white piece of paper.  I added a Hello Kitty sticker that I had for a little more cuteness!  In a matter of 10 minutes or so, I've turned a simple composition book into something cute and fun! Great idea for kids!  I'm all about making things fun for them, especially school!!

Photobucket

Monday, August 27, 2012

Lunch Bunch

This weeks challenge was to create a project around 3 random words that were selected.  The 3 words were  bee, guitar and lunch.  You could do something with all 3 words or just select 1 or 2 of the words and created something with it.


This week we have 2 awesome sponsors!


I decided to use the word lunch and made a tir-fold card.  

This is the front of the card, the image is on the top flap of the card.  I made a hamburger, pizza and soda using the cricut.  I added a piece of grosgain ribbon to make it a little more fun.


When you open the top flap of the card, this is the inside of the flap.  The hearts and letters are also using the cricut.  

This is the middle of the inside of the card.  The drink is also cut from the cricut, and the sentiment is handwritten with one of my fav white pens!

Lastly this is the bottom flap of the inside of the card.  I thought it looked a little odd plain, so I decided to add more hearts.  This area could be used to write a little message.

This is what the card looks like opened up.

Majority of the images were using scraps from other projects, also the ribbon was left over from the Mickey Party and some other projects!  Nothing goes to waste!  
Join in on the fun!!

Also entering this card in the following:
365 Cards: Day 181 Gotta Have It
Challenges 4 Everybody: CH #1 Anything Goes 
Totally Stampalicious: Anything Goes 
Pile It On Challenge: I Spy Something With a P 
Fat Pages With Attitude: Anything Goes 
Paper Crafting Journey: Anything Goes 
Emerald Faeries:  CH #30: Punches & Dies 
Forever Friends: CH #43: Anything Goes 
Party Time Tuesdays: PTT #83: Anything Goes
LEJ Designs: CH #18 Anything Goes 
Make it Monday: MIM #104 Anything Goes 
Use It Tuesday: CH #38 Use That Ribbon 
Simon Says Stamp: Anything Goes 
Just Magnolia: CH #171 Show Me a Heart 
Everybody Art Challenge: CH #202 Anything Goes 
The Crazy Challenge:  CH #127 Anything Goes 
Kenny K's Krafty Krew: CH #108 Anything Goes 
Through the Craftroom Door: CH #33 Diva or Anything Goes 
The Celebration Shoppe: What I Made Wednesday 


Photobucket

Sunday, August 26, 2012

Learn With Joy Blog Hop & Challenge

 
Welcome to the Learn With Joy Blog Hop & Challenge by Tuesday Alchemy! I hope you enjoy the projects that were created this week!  Happy Hopping! Hope to see you join in on all the fun!


*Blog Hop & Challenge Info*
Theme this week is Learning With Joy, come up with a project that falls into that category and link it up to the challenge blog: tuesdaylachemy.blogspot.com

This week were are so fortunate to have 3 sponsors.  There will be 2 lucky winners for participating in this weeks challenge, and 1 lucky winner for participating in the blog hop.


 *How To Participate*
**In order to win the blog hop prize, you must leave a comment in the blog hop post.  One of our Tuesday Alchemy design team members will be chosen at random to select a winner from the comments section.  You do not have to be a follower on every blog, but you DO need to leave a comment in order to qualify for prizes.
Good Luck!


This was our inspiration for this week!


I decided to do something a little different this week.  Since the theme this week is LEARNING, I decided that I wanted to create something that revolves around that concept.  I thought it would be fun to create alphabet learning flash cards.   I made cards in all different colors to make it appealing and fun to children.  I used the letters of the alphabet and made pictures using different images using my cricut and my eclips machines that associated with the letter.  Most of the images are animals, not too long ago I wrote about making a lot of critters and now I'm putting them to use.  Most of the papers used to make the pictures were from scraps that are left over from previous projects.   I wanted to make it fun for the children, so I used a lot of bright colors and different patterns.  I know that we often associate certain things with certain colors, but I didn't really do that for all of the pictures.  I didn't get too wild with it, but I did do some things in a little different color spectrum.   I think that children should be able to use their imaginations, and not only see things according to what society tells them it is.  I want to encourage individualism and outside of the box thinking. 
Aa is for Apple
Bb is for Bear
Cc is for Cat
Dd is for Dog
Ee is for Elephant
Ff is for Fish
Gg is for Giraffe
Hh is for Horse
Ii is for Ice Cream
Jj is for Jack O Lantern
Kk is for Kite
Ll is for Lemon
Mm is for mouse
Nn is for Nose
Oo is for Owl
Pp is for Penguin
Qq is for Queen
Rr is for Rabbit
Ss is for Sun
Tt is for Tree
Uu is for Umbrella
Vv is for Vase
Ww is for Whale
Xx is for X-ray
Yy is for Yo-yo
Zz is for Zebra


I cut the cards with a hole at the top to add either ribbons to make it even more exciting for the children.  I will also add a removable ring to the hole so it can be kept together easily.  I laminated each card, so it will last longer. I am planning on giving this to my friends daughter who is currently in preschool.  I hope that you enjoyed this project as much as I enjoyed making it!  
Hop on over to the next blog!


Kelli - You Are Here
Maria - Your Next Stop
Photobucket

Friday, August 24, 2012

Learning Pinspirations

Love & Learn

Liberate yourself in books

Word.

Such a great idea

Never too young 

All species learn

NEVER STOP!

This week was all about learning.  May it be in school, at home, in sports or activities.  Learning really is an everyday experience.  Make it a goal to learn something new each day. 


Photobucket

Memory


Remember the days before computers, Iphones, Ipads, or any electronic devices? How did anyone function? haha! I know that there are so many techie people out there that can't go a day, or even an hour without their phone or some sort of electronic device.  Now days, I see so many children working on Ipads and computers, there are so many games and educational programs on those devices.  With the learning theme going this week, I decided to make a memory game.  Do children even know what this is? Or how to even play it?  It's very simple, but that's what might make it too hard for them to grasp?! I think once in a while it's good to teach children how to do things the long way.  Teach them the simplicity in things, so they have something to fall back on one day when the electricity goes out?! :) 

This particular memory game, is aimed more for a girl since it's so girly and pink.  It surely can be made for a boy using different pictures.  Again I cut all the pictures with my cricut, using up a lot of scraps.  The main thing is to make sure that you have enough scraps to make 2 of the same thing.  I cut the squares at 2 1/2", so it's not too big, but big enough for the children to handle easily.  For the squares I used a cute polka dot paper, I was trying to find a double-side paper but didn't have anything on hand.  I made 40 squares, to make an easy 20 pairs.  I used easy pictures and things that are easy to relate to for little girls.  Things like hearts, cherries, strawberries, sun, flowers, butterflies, happy faces, shoes, bows, etc.  


I also laminated the cards, so they will last longer and be a little thicker.  

I plan to make more memory game sets, but in themes, like Hello Kitty, Disney, Boy designs, etc. 
This is a fun and easy project that will surely occupy any little one! Who knows, it might be even more fun than the apps on an Ipad?! haha!


Photobucket