Showing posts with label Critters. Show all posts

Saturday, June 28, 2014

Rrrrrrr you ready to parrrrrttyy?!

Hi! Just checking in!! I wanted to make a note, that my last couple posts have been from my phone via blogger app! It's pretty wonderful! I know I'm a little late to the party, but I did have it on my old phone bit didn't really use it.  I'm still getting the hang of the features, but it's pretty easy!

Anywho! How is your summer going so far??! Can you believe how fast June has gone by?! It's getting hotter around here, and currently I'm sick! #ick I hope to get better soon, because it sucks being sick when the weather is so perfect outside!  I hope you're enjoying the summer so far!

Just wanted to share a little birthday tag that I made recently!  It was a pirate theme, and such a cute parrrrrttyy!  I used the cricut for the entire tag.  Tags, bags, and boxes for the tag shape. Create a critter for the rest of the images.  I used raised double stick tape to make the images pop out a little more, and of course decorated the entire tag with my fave, white pen! Super simple, and fun!!

Wednesday, June 11, 2014

Spring Flings

It's been a little bit since my last post! I just wanted to share some things that I made recently for a couple of 1st birthdays! I'm enjoying the Summer so far, and trying to make the most of the sun!! What are your plans for the Summer?

Thursday, May 1, 2014

EOSter goodies

This is another little treat that I made this Easter for my friends!! I used the EOS lip balms! They look like Easter eggs, so it is perfect for the occasion!  All I did was put it in a little clear baggie, and threw in some confettit, tied it with a cute ribbon and added a tag! Viola!  That's it! Smiles for everyone!  EOS smiles that is!!:) 

What's your fav EOS flavor?? Do you like any of the other products? 

Cheers!

Tuesday, April 22, 2014

For someBUNNY special!

Happy Easter! I know that it's a little late, but you know how it goes! I just wanted to share some Easter goodies that I made this year. 

This is a little goodie jar that I saw on pinterest!  I have to admit that I thought it was gonna be super easy to make, but was a little harder than I thought. I tweaked it a little here and there, and just went with what worked! 
 
To make this, I used edible grass, egg shaped candies, candy bunnies, mason jar, ribbons, and stickers.  The edible grass is very interesting, the green grass that I used here is green apple flavored, there is also little yellow bunny confetti that is banana flavored.  Stuff the grass inside the jar, I used a spoon to push it down and flatten it a little.   I added the egg shaped candy to the jar.  Through trial and error,  I decided to leave the bunny in the wrapper.  I've seen on pinterest that people use chocolate bunnies, and put them unwrapped in the jar.  I did not use chocolate bunnies, just because they were a little on the pricey side, and I wanted to keep the cost down.  The price of one chocolate bunny, was the same as a pack of five bunnies.  I got Reese's and cookies and cream bunnies.  Since they were a little on the smaller side, I opted to put two together in one jar.  I put them back to back,  so you could see it front and back in the jar.  I also want to add that the jar that I used, is completely smooth.   No writing,  or designs on the jar.  I got them at Walmart,  I was excited to find these babies!  I wedged the bunnies in the middle of the grass, and added more eggs around the bunnies to make Iittle more secure.  Adjust things around to your liking.   Now to add a little sass to the jar, I wrapped the outer rim of the jar with grosgain ribbon,  and put stickers on the top of the jar to jazz it up a little.  To top it of I added an Easter tag! 


 I love how these came out! It's so festive,  and doesn't it just make you wanna smile?! :) 

The fun thing about Easter, is that you can use pretty much any color!  It doesnt have to be just pastels! 

What do you love about Easter?!

Thursday, March 7, 2013

Hopping into Spring

 
It's that time again!  The Cadbury commercial is in full Spring!!  I love that commercial! It never gets old!! I'm hop,hop,hopping into EASTER!!! While I create more Spring treats to share with you, I want to share some of my past Spring seasons with you.  Some you probably have seen before, so pardon the duplicates. 

Part of an Easter collection that I made.  I was getting tired of making the front of the bunny, so I just decided to do the back! Which I actually like but than the front!! :) To give it a little cuteness, I just added a dab of cotton to the bonbon!

Chickadee is walking around the garden trying to find some Easter eggs! A cute tag, that could be used for a boy or a girl!

This was part of a baby shower gift that I made.  Just looking at all the colors makes me smile!  I will be making these again this Spring for different occasions!

Another Spring tag, great to add to Easter baskets! The best thing about Spring is that you can't really go wrong with any color!

A little swag with your bag! Can be used as a little Easter goodie bag or even an Easter hunt bag.  Pink Lemonade hopping in the garden looking for some eggs.

Little sweet treat bags.  This is the same little bag that I use for the lollipop flowers, I just added a simple fluttering butterfly to make it a little more fun!!

Another does of sweetness!  This picture is giving me a toothache!  This is a very simple way to give a little treat! I've done it with all different treats inside, sunflower seeds, M&M's, whatever fits. 


This is my fav!! It's a mini garden of sweets!  There's 8 individual lolly flower bags in each box!! It's perfect for an office gift or a table centerpiece!! I love how the flowers all come together!! 

This Spring season, I will be doing a lot of the same and a little bit different!  Can't wait to show you what I've been working on!  
 
Spring is filled with so many sweet surprised, what's your favorite Easter sweet treat?  

Hoppy Spring!


Image and video hosting by TinyPic

Monday, February 11, 2013

Tweets!

I got a new cricut cartridge a couple weeks ago.  I've been so busy, that I haven't really got a chance to try it out.  I fiddled around a little with it, and this is what I made.  This is from the Create a Critter 2 cartridge!  Many of you know, that I use the Create a Critter cartridge a lot, so when I saw this cartridge coming out I was so stoked!  I finally went out and got it!  There's so many cute animals and it also has something for ach season!  This is exactly what I've been looking for!  


I think that this little birdie is so cute! I had to try her out! I think I will call her "tweets"! 

Since it's Valentine's Day week, I figured that I make something Valentine's day ish!  This card could even be used for other occasions.  I left the inside blank, so there is a lot of room to write your personal message.  Stay tuned for more from this cartridge!

Playing along with:


Image and video hosting by TinyPic

Thursday, October 4, 2012

Wishing your a BEARy Happy Birthday!


I made this simple birthday card using up all my scraps and the last of my critters that I made earlier this summer!  I wanted to match the polka dot look and I just so happened to stumble upon this piece that I cut a while back.  The color matched the theme perfectly! Don't you love it when things like that just come together?!  I still need to work on my stamping skills! I always tend to get one side darker then the other! I added the balloon to make it a little more festive!  The inside is blank so you can write your own special message.  I figure that this salmon, maroon, polka dot combo is not too girly, maybe it could be for a boy too?  I guess to each is own?!!

Hope everyone is having a great week!
Photobucket

Wednesday, October 3, 2012

Mr. Crab


What a crab! Here's another simple all occasion card that I made.  I scalloped the edge of the card to make it a little different.  I made the crab with the create a critter cricut cartridge.  The inside of the card is blank for writing your own message.
Photobucket

Saturday, September 29, 2012

Dino-mite


Here's another card that I made on the whim, again with the cricut! This was another critter that I made earlier in the summer and saved.  I used the Tiffany blue scalloped card again on a Heather gray card, I used the thick double-stick tape to give it the raised look.  Accented the coral card with my fave white metallic pen and stamped the image in black.  For Dino, I made him in bright neons to really make him pop!  The inside of this card is blank.  

I hope you have something to celebrate this weekend! If not, it's the weekend! Celebrate! 
Happy Friday!
Photobucket

Friday, September 7, 2012

Bandit the Raccoon


Bandit the Raccoon!
He's stealing ♥hearts♥everywhere he goes!
I made this card using the raccoon from the create a critter cricut cartridge.  The talking bubble I found in a box of things that I cut a while back.  Since I have so much scrap pieces of paper, I have been using it for punches and punched out a bunch of hearts.  The ribbon is left over from a banner that I made.  Since there is no word sentiment, this can be an all occasion card.  


**Check out all these blogs! Awesome creations by all!
Also playing along with the following challenges:

Photobucket

Wednesday, September 5, 2012

Keeley Koala

I decided to make a card with Keeley Koala!  I used a shimmer purplish card stock for Keeley's body, I added some fuzzy glitter to her ears to make her look more, well Koala-ish.  I cut the card with the pinking look and turned it upright for a different look.  The light plum card matted on the back of Keeley is actually left over from the turtles & frogs party.  I used tiny scraps to punch out the little butterflies zooming around Keeley.  I accented them with a little bling gem and used metallic white pen for their zzzooms.  Lastly I stamped the sentiment which didn't come out as great as I hoped! :(  I think it's because the stamp wasn't cleaned well and it dried up and while I was stamping it kinda fell off the backing, that's why it looks warped.  It's okay, it wouldn't be mine if it came out straight! haha! ☺ This card is an all occasion card! 


Also playing along with:

Photobucket

Sunday, August 26, 2012

Learn With Joy Blog Hop & Challenge

 
Welcome to the Learn With Joy Blog Hop & Challenge by Tuesday Alchemy! I hope you enjoy the projects that were created this week!  Happy Hopping! Hope to see you join in on all the fun!


*Blog Hop & Challenge Info*
Theme this week is Learning With Joy, come up with a project that falls into that category and link it up to the challenge blog: tuesdaylachemy.blogspot.com

This week were are so fortunate to have 3 sponsors.  There will be 2 lucky winners for participating in this weeks challenge, and 1 lucky winner for participating in the blog hop.


 *How To Participate*
**In order to win the blog hop prize, you must leave a comment in the blog hop post.  One of our Tuesday Alchemy design team members will be chosen at random to select a winner from the comments section.  You do not have to be a follower on every blog, but you DO need to leave a comment in order to qualify for prizes.
Good Luck!


This was our inspiration for this week!


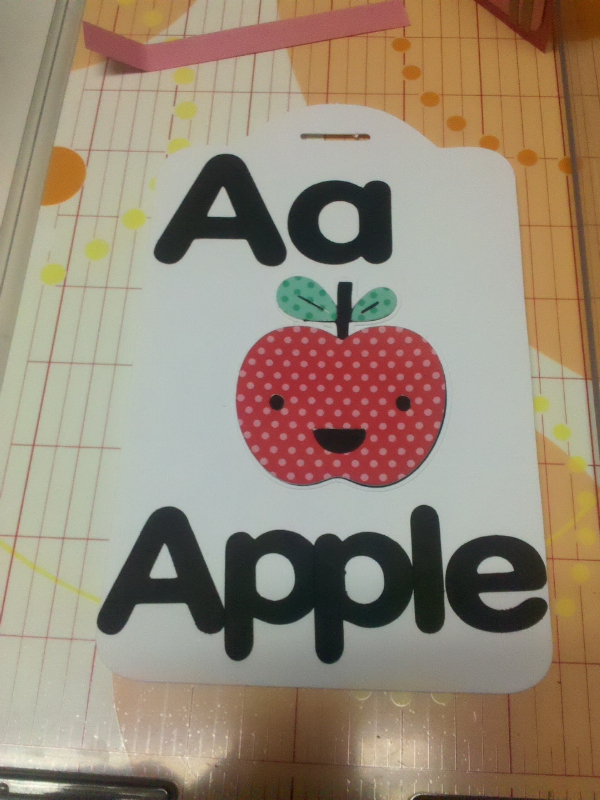
I decided to do something a little different this week.  Since the theme this week is LEARNING, I decided that I wanted to create something that revolves around that concept.  I thought it would be fun to create alphabet learning flash cards.   I made cards in all different colors to make it appealing and fun to children.  I used the letters of the alphabet and made pictures using different images using my cricut and my eclips machines that associated with the letter.  Most of the images are animals, not too long ago I wrote about making a lot of critters and now I'm putting them to use.  Most of the papers used to make the pictures were from scraps that are left over from previous projects.   I wanted to make it fun for the children, so I used a lot of bright colors and different patterns.  I know that we often associate certain things with certain colors, but I didn't really do that for all of the pictures.  I didn't get too wild with it, but I did do some things in a little different color spectrum.   I think that children should be able to use their imaginations, and not only see things according to what society tells them it is.  I want to encourage individualism and outside of the box thinking. 
Aa is for Apple
Bb is for Bear
Cc is for Cat
Dd is for Dog
Ee is for Elephant
Ff is for Fish
Gg is for Giraffe
Hh is for Horse
Ii is for Ice Cream
Jj is for Jack O Lantern
Kk is for Kite
Ll is for Lemon
Mm is for mouse
Nn is for Nose
Oo is for Owl
Pp is for Penguin
Qq is for Queen
Rr is for Rabbit
Ss is for Sun
Tt is for Tree
Uu is for Umbrella
Vv is for Vase
Ww is for Whale
Xx is for X-ray
Yy is for Yo-yo
Zz is for Zebra


I cut the cards with a hole at the top to add either ribbons to make it even more exciting for the children.  I will also add a removable ring to the hole so it can be kept together easily.  I laminated each card, so it will last longer. I am planning on giving this to my friends daughter who is currently in preschool.  I hope that you enjoyed this project as much as I enjoyed making it!  
Hop on over to the next blog!


Kelli - You Are Here
Maria - Your Next Stop
Photobucket