Showing posts with label Challenges. Show all posts

Monday, October 27, 2014

Halloween Tags


It's that time of the year again!!! October! Halloween!! Yes!! I love Halloween!! Every year I think all year long about ideas for potential costumes.  I always do this, in hopes that I will be well prepared with a costume, but it never fails, here I am the week of Halloween and I'm scrambling for a costume! UGH! I have so many great ideas, so why can't I nail it down and get it going?!! I think the only answer I can really come up with, is too much excitement over the season! That combined with a little(a lot) of procrastination.  I love giving goodies out for Halloween!! Honestly, when it comes to the kiddies I don't like to give them all candy.  I like giving them a little tricks too.  Here are some tags that I made for this Halloween.  I made all of these tags with my cricut, using the Create a critter 2 cartridge for the images, and the tags, bags, and boxes cartridge for the tags.  I will post more to follow! 

Do you dress up?  What are you going to be this year?  What is your fave Halloween treat?

Playing along this week with:

Wednesday, September 24, 2014

Thanks a bunch!

Hello there!! It's been  a long time since I've posted a card!  This is a thank you car that I recently made for my aunty!  I've been having fun making this style of card, it is very simple but I love it!! 

This is the card all put together.

This is the card, I wrote my personal message on the back of this card.

I folded an accent piece of card stock

I added the sentiment to the "band" part of the card 


The assembly of this card is very simple.  It is basically 3 pieces.  You will need 1 card as your main card, add some die cuts, stickers, draw a picture, whatever your heart desires.  Get a smaller piece of paper and cut it down to at least half of the first piece. Make sure that it's the same width as your main card.  Fold it in half, slip the main card inside the card that you just folded.  Now for the last piece, since it is just an accent, it can just be a strip since it is just an accent.  Wrap it around the entire width of the card.  This piece holds the card together.  You can leave it as it is, or decorate it  like I did.  It will also look cute, with a ribbon or tulle tied around it as well.  You can also add more cards if you'd like.  This design is great for invitations as well.  

To make this card I used the cricut walk in my garden cartridge, and butterfly punch.

I hope you like it!
Cheers!

This week I am playing along with:


Wednesday, October 3, 2012

Hello Kitty Folder


This week we have 2 great sponsors:


Be sure to check out their sites for all their goodness!!

I decided to make one of my folders for this challenge!  Of course it's Hello Kitty!  I used a mead folder for this project, it is very durable, inexpensive and has a lot of pockets!  I used the My Little Twin Stars paper tape and ran it across the folder from end to end creating a stripped look.  I made the Hello Kitty head with my big shot in coordinating colors, light blue and brown.  This color combo is great for someone who likes Hello Kitty, but not really girly or that into pink.  A very simple project, and a great way to add some excitement to a regular folder. 


Photobucket

Thursday, September 6, 2012

Frankie Froggy


Made this birthday tag with Frankie froggy! Doesn't he just make you wanna smile back at him?!  I've been making good use of this tiny butterfly punch, using up all my scrap pieces.  I love how the colors came together!  All these pieces were previously cut from other projects and I had them stored in a box.  As I was fishing through them, I pulled these colors out and they worked with Frankie so I put it all together!  Don't you love when things just happen like that?! ♥

Also playing along with these challenges:
Photobucket

Wednesday, September 5, 2012

Keeley Koala

I decided to make a card with Keeley Koala!  I used a shimmer purplish card stock for Keeley's body, I added some fuzzy glitter to her ears to make her look more, well Koala-ish.  I cut the card with the pinking look and turned it upright for a different look.  The light plum card matted on the back of Keeley is actually left over from the turtles & frogs party.  I used tiny scraps to punch out the little butterflies zooming around Keeley.  I accented them with a little bling gem and used metallic white pen for their zzzooms.  Lastly I stamped the sentiment which didn't come out as great as I hoped! :(  I think it's because the stamp wasn't cleaned well and it dried up and while I was stamping it kinda fell off the backing, that's why it looks warped.  It's okay, it wouldn't be mine if it came out straight! haha! ☺ This card is an all occasion card! 


Also playing along with:

Photobucket

Monday, August 27, 2012

Lunch Bunch

This weeks challenge was to create a project around 3 random words that were selected.  The 3 words were  bee, guitar and lunch.  You could do something with all 3 words or just select 1 or 2 of the words and created something with it.


This week we have 2 awesome sponsors!


I decided to use the word lunch and made a tir-fold card.  

This is the front of the card, the image is on the top flap of the card.  I made a hamburger, pizza and soda using the cricut.  I added a piece of grosgain ribbon to make it a little more fun.


When you open the top flap of the card, this is the inside of the flap.  The hearts and letters are also using the cricut.  

This is the middle of the inside of the card.  The drink is also cut from the cricut, and the sentiment is handwritten with one of my fav white pens!

Lastly this is the bottom flap of the inside of the card.  I thought it looked a little odd plain, so I decided to add more hearts.  This area could be used to write a little message.

This is what the card looks like opened up.

Majority of the images were using scraps from other projects, also the ribbon was left over from the Mickey Party and some other projects!  Nothing goes to waste!  
Join in on the fun!!

Also entering this card in the following:
365 Cards: Day 181 Gotta Have It
Challenges 4 Everybody: CH #1 Anything Goes 
Totally Stampalicious: Anything Goes 
Pile It On Challenge: I Spy Something With a P 
Fat Pages With Attitude: Anything Goes 
Paper Crafting Journey: Anything Goes 
Emerald Faeries:  CH #30: Punches & Dies 
Forever Friends: CH #43: Anything Goes 
Party Time Tuesdays: PTT #83: Anything Goes
LEJ Designs: CH #18 Anything Goes 
Make it Monday: MIM #104 Anything Goes 
Use It Tuesday: CH #38 Use That Ribbon 
Simon Says Stamp: Anything Goes 
Just Magnolia: CH #171 Show Me a Heart 
Everybody Art Challenge: CH #202 Anything Goes 
The Crazy Challenge:  CH #127 Anything Goes 
Kenny K's Krafty Krew: CH #108 Anything Goes 
Through the Craftroom Door: CH #33 Diva or Anything Goes 
The Celebration Shoppe: What I Made Wednesday 


Photobucket

Sunday, August 26, 2012

Learn With Joy Blog Hop & Challenge

 
Welcome to the Learn With Joy Blog Hop & Challenge by Tuesday Alchemy! I hope you enjoy the projects that were created this week!  Happy Hopping! Hope to see you join in on all the fun!


*Blog Hop & Challenge Info*
Theme this week is Learning With Joy, come up with a project that falls into that category and link it up to the challenge blog: tuesdaylachemy.blogspot.com

This week were are so fortunate to have 3 sponsors.  There will be 2 lucky winners for participating in this weeks challenge, and 1 lucky winner for participating in the blog hop.


 *How To Participate*
**In order to win the blog hop prize, you must leave a comment in the blog hop post.  One of our Tuesday Alchemy design team members will be chosen at random to select a winner from the comments section.  You do not have to be a follower on every blog, but you DO need to leave a comment in order to qualify for prizes.
Good Luck!


This was our inspiration for this week!


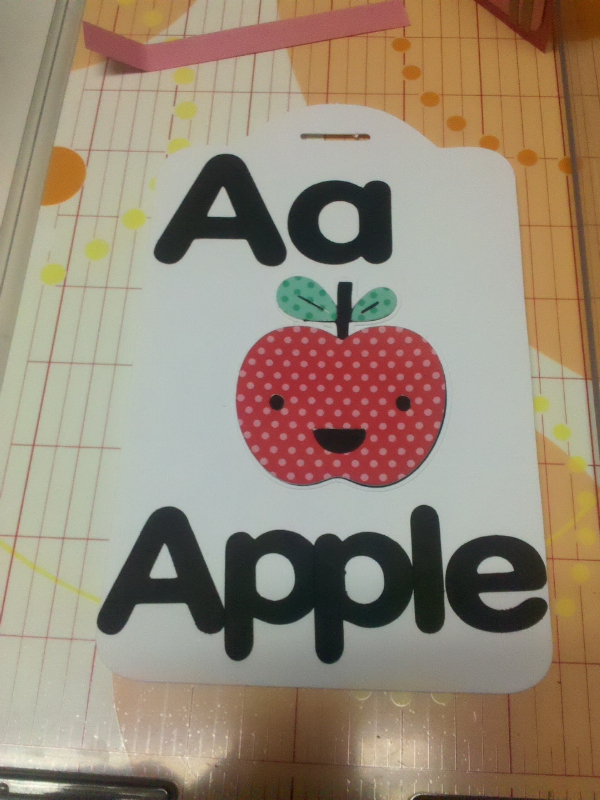
I decided to do something a little different this week.  Since the theme this week is LEARNING, I decided that I wanted to create something that revolves around that concept.  I thought it would be fun to create alphabet learning flash cards.   I made cards in all different colors to make it appealing and fun to children.  I used the letters of the alphabet and made pictures using different images using my cricut and my eclips machines that associated with the letter.  Most of the images are animals, not too long ago I wrote about making a lot of critters and now I'm putting them to use.  Most of the papers used to make the pictures were from scraps that are left over from previous projects.   I wanted to make it fun for the children, so I used a lot of bright colors and different patterns.  I know that we often associate certain things with certain colors, but I didn't really do that for all of the pictures.  I didn't get too wild with it, but I did do some things in a little different color spectrum.   I think that children should be able to use their imaginations, and not only see things according to what society tells them it is.  I want to encourage individualism and outside of the box thinking. 
Aa is for Apple
Bb is for Bear
Cc is for Cat
Dd is for Dog
Ee is for Elephant
Ff is for Fish
Gg is for Giraffe
Hh is for Horse
Ii is for Ice Cream
Jj is for Jack O Lantern
Kk is for Kite
Ll is for Lemon
Mm is for mouse
Nn is for Nose
Oo is for Owl
Pp is for Penguin
Qq is for Queen
Rr is for Rabbit
Ss is for Sun
Tt is for Tree
Uu is for Umbrella
Vv is for Vase
Ww is for Whale
Xx is for X-ray
Yy is for Yo-yo
Zz is for Zebra


I cut the cards with a hole at the top to add either ribbons to make it even more exciting for the children.  I will also add a removable ring to the hole so it can be kept together easily.  I laminated each card, so it will last longer. I am planning on giving this to my friends daughter who is currently in preschool.  I hope that you enjoyed this project as much as I enjoyed making it!  
Hop on over to the next blog!


Kelli - You Are Here
Maria - Your Next Stop
Photobucket